March 2011

March 2011
March 2011
Click on any of these small images for larger photographs.
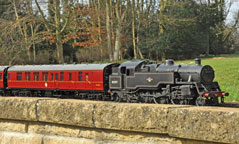
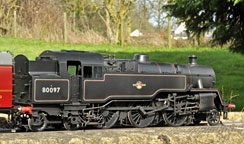
The Finescalebrass locomotives have well made, accurate and robust brass bodies. As sold they are good value models for running on Gauge One G1MRA Standard track. This is an excellent product, made in brass by Sang Cheng in China.
Notes on converting the wheels from Gauge One Standard (as supplied) to Gauge One Fine and Scale, using new wheel castings.
Warning: dismantling, replacing the wheels and re-assembling is not for the faint hearted. Only attempt it if you are prepared to drill out the driving wheel centres and make new axles - either stepped up 0.5 m diam. in the middle, or with a thin walled sleeve.
The trailing bogie is mounted on a spring on a single rigid post with some sideways movement on the mounting slot on the bogie body. As the bogie as a whole cannot swing, be sure to use only narrow spacers outside the bearings to keep the original amount of loose sideplay on the axles.
Remove the coupling rods.
Remove 6 body screws to separate the chassis from the body. The middle screws are very inaccessible and need a long thin screwdriver.
Remove the bottom cover plate.
Unsolder the ends of the brake cross bars to remove the brake pull rods and cross bars as a single unit.
Remove the round valve gear support pillars. If the nuts are too tight cut the pillars just short enough to clear the middle axle wheels which lift upwards from the chassis, later rejoin with a thin walled sleeve.
Remove 2 screws on each side of the chassis to free the motor end-support plate so that it will lift off with the middle axle. (This is easier than undoing the motor end spring and attempting to relocate it afterwards while it is still fixed in the chassis.)
Lift out the driving wheels on their axles.
The wheels are not easily removable from the axles. They are secured on square ended axles with large counter-sunk screws with very small hexagons recessed in the centres. These were so tight (possibly with some help from the paint or glue) that they could not be moved by a hexagon wrench and had to be drilled out.
The driving wheels as supplied are rim insulated, but as I use centre insulation I fitted delrin bushes for the axle and also for the coupling rod pins. The bushes were extended 2.5 mm on the inner faces to compensate for the extra sideplay from an increased back to back.
Coupling rod pins: Outer coupling rod pins are M2 bolts with hexagon heads and easily unscrewed for reuse.
The driven wheel's pin is plain, not threaded and can be tapped out from behind once the wheel is removed. I did not reuse the pins but used my own long pins which are threaded M3 into the wheel insulating bush, and have (by handy co-incidence) 3.0 mm dia shanks.
The axles are 4.5 mm dia, stepping down to 4.0 mm to fit the ball races. The thicker middle part centres the axles, and must be reproduced to fit the gearwheel on the driven axle, in my case I used 4.0 axle shafting with a turned 4.5 mm sleeve in the middle. Plain 4.0 mm axles can be used for the outer axles, though I still used the 4.5 mm sleeves as a spacing guide for pressing-on the ball race bearings. If the side play is limited by spacers outside the bearings.
I turned the castings to the dimensions shown for P73 and for P74. The scale drivers were turned with an extra 1.0 mm thickness on the rear of the hubs for a more secure fitting to the insulating bushes.
For the scale version, with 42.5 mm back to back the plastic cross sleeves which hold the current collectors were cut in half, 2.0 mm spacers inserted and 12 mm lengths of brass sleeved slipped over the join.
27 Mar 2013